Sunday, October 4, 2009

Controlled collaboration in Ms Word

A fews users asked me about this the other day... how do you manage the changes made by multiple people within a document. So for this post I have a document which will be worked on by two persons, and in designated areas within the document. What I'll do is, I'll bind the specific paragraph to the editor and they would only have permission to edit the approriate areas. After they have done that, I'll do a compare and combine between the doucments to come up with the final version of the word document.

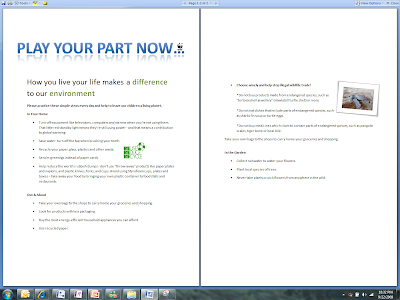
Let's start with this working document, this is paper about how we can 'Play Our Part' towards the environment - every change no matter how small does make a difference :)

I'd like to start by allocating the portions of the document's content to it individual editor, in the ribbon, click on the Review tab and on the right end you will see the option to 'Protect Document', click on the drop-down option and choose 'Restrict Formatting and Editing'.


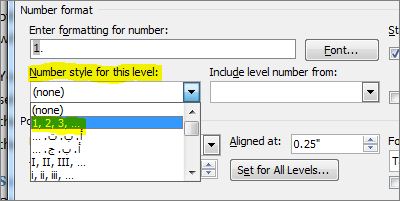
A side pane for 'Restrict Formatting and Editing' will appear and you will be given a few choices of controls to choose from. '1. Formatting restrictions' is when you want to control the formatting of the styles that the next editor is allowed to choose from. What I intend to do however is not to control the formatting but the editing permission which comes in '2. Editing restrictions' and the list here show the different types of editing, and I will go for 'No changes (Read only)', which means this document is Read-Only unless you have been given the permission to edit it.


This is where you can set the exceptions for editing the document by clicking on 'More Users' and add the users by their domain ID, yes this will only work within the company/corporation domain.

Now I have added myself and my colleague Maryam as editors for the document.


How do I assign the editing permission for Karen, just highlight the area ('Out & About' paragraph) and select the editor from the list. Repeat this till you have covered all the areads which needs to be edited by the names that you have specified in the exception list.

The last step would be to set a password for the document.

After specifying the password, I have emailed the document to Maryam to edit her portions. Now when I (Karen) open the document, it would look something like this:- in the 'Restrict Editing and Formatting pane on the right, I can click on the button to find the regions which I have been permitted to edit, which then will be highlighted within the document. Let me carry on now and make the changes in the paragraph.

So right now when the edited documents come back from Maryam and Karen, there are actually three versions on the document, the draft, Maryam's edit and Karen's edit. Before I can proceed and do a compare between the documents, I need to remove the password to tall three documents otherwise the compare wouldn't be able to work with protected/encrypted content.


In the Review tab, there is the option to Compare two different versions of the document.


I have chosen the draft version here as the original document and Maryam's copy as the revised document and to label her changes with her name 'Sharifah Maryam'.

I know this layout may be a little bit confusing when you first look at it, in the ribbon, still in the Review tab, in the Compare group, you can choose what you want to look at by clicking on one of the options listed in 'Show Source Documents' and if you feel like you don't want to look at so many documents, you could choose to 'Hide Source Documents' and only show the revised document.

In the Tracking group, you can decide how you want the revisions to be shown by clicking on the Balloons dropdown.


The Reviewing Pane is on the left side and here you will be informed on the changes which are between the original and revised document and it is up to you to decide to accept or reject the changes.

After I have compared the documents and have decided which change to keep in Maryam's copy, now I will do a Combine with Karen's copy. Similar to how the dialog box looked like for Compare, we need to browse for the original and revised document and specify how you want the changes to be labeled, here I put the author's names as the labels. When the 'More >>>' button is chosen, the list of the types of changes monitored within the document is shown and you actually have control to pick and choose the settings.


On the Reviewing Pane you will see the changes by the different labels which were specified earlier which are the editors' names.

Right now that I have finalised on the changes between the documents, I'd like to make the document size smaller by compressing the pictures in the document. Click on one of the pictures so that we see the Picture Tools contextual tab and choose 'Compress Pictures' in the Adjust group. And when you click 'Options...' I want to make sure that the highest compression is applied (for email) and the cropped areas are deleted.


From 157MB, now it's only 72.5MB in size... how great is that... lightweight documents, my favourite :)

Sunday, August 2, 2009

Headers, Footers, Page Numbers

I have been so caught up with work and my weekends have been too short so yea...forgive me for leaving such a big gap since my last post.. Now let's get back to more 'work smart' with Office 2007, shall we ;)

This post comes from a question which I received from a user when he was creating his documentation. This was the scenario : his document has a cover page, a table of content, and the document body. He had problems fixing the header and the page numbering.

Let's start on this, what I have done in this document here is to put in all my content, the proper headings, generated the table of content and also inserted the cover page (notice the lovely sunflower there :) ) First step would be to settle the content of your document.


Right now, I have just inserted the header (Insert tab > Header > choose the header which you want), the headers have come out on all 4 pages.


I also want the page number to be shown in the header, so I've set my cursor to the end of the header (after '2009') and since the cursor is within the the header, the contextual tab for Header & Footer Tools > Design tab is shown in the ribbon. Choose the Page Number > Current Position and select the number formatting of your choice.

The header now contains the document name, year and also the page number. Next I would like to set a new section for the 'Introduction' portion onwards. Therefore my cover page and table of contents (toc) will be in Section 1, and Introduction onwards will be in Section 2. Click at the beginning of the heading 'Introduction' and go to the Page Layout tab > Breaks > Sections Breaks (Next Page) to do this, or refer to my previous post. I only want my content ('Introduction' onwards) to have the header and page numbering, that starts from page 1.


Click within the 'Header - Section 1' and in the contextual tab for Header & Footer Tools > Design tab in the Options group, make sure the 'Different First Page' option has been cleared, afterthat navigate to the next section by clicking on 'Next Section'.


We are now in Header - Section 2, perform the same checking, make sure the 'Different First Page' option is cleared as well, and turn of 'Link to Previous' so that Section is independent of Section 1.

Once we have done those two checks, click within the document body of Section 1 (cover page and toc), go to the Insert tab, and in Header, choose 'Remove Header' right at the bottom of the options list. This will remove the header in Section 1.


Move to Section 2, choose Page Number (still in the Insert tab) and click on 'Format Page Numbers'. In the Page Number format window, under 'Page Numbering' select the option to Start at: "1" and voila...


That's all there is to it, of course if you follow the steps accordingly.. ;) These steps apply for footers as well.

Sunday, May 31, 2009

Customizing a Multilevel List

If you get frustrated with multilevel lists and customizing them, then you are on the right page. Fret not, let me take you step by step to doing this, and hopefully after this you would wonder, 'why was there any frustration in the first place again?' :)

As usual, I have a dummy document ready here which the headings have been formatted into desired styles, these screenshots will give you a run-through on the diffrent headings which have been set.

Let's have a better look via the Document Map.


In the Home tab, within the Paragraph group, you will find 'Multilevel List', and here there are already a few preformatted templates for you to choose from.


I want to have control on how my multilevel list is formatted, and need to do my own customization based on the format which has been fixed for me to follow (for instance).


First step, click on 'Define New Multilevel List' and when the window appears, click on the 'More' button at the bottom to have a look at more options.

Here's the setting for the first level, I have highlighted in yellow the areas which I have changed. I want the first level to be linked to Heading 1, and for this customized multilevel list to show up to 4 levels in the gallery.


For the second level, I want to inherit the number from Level 1 followed by ".1" and so on. To do this, clear the formatting for number text box first, then choose 'Level 1' from the dropdown of 'Include level number from'.


This is what you will see in the 'Formatting for number' text box.


When you have done that, then choose the formatting for after the '.' (point) symbol.

Here is a clearer screenshot to show the changes in the settings that I have made for Level 2 in the multilevel list.


Settings for Level 3, notice for all the changes that is specified, it is previewed on the top left corner so that changes especially in the level and text alignment can be done correctly.


Lastly, level number 4 settings are as follows:


Click on the Ok button and the customized multilvel list is applied to your document.


Here I have typed "(i)" for a point which I have inserted in the document, and when I press the , the formatting for Level 4 automatically kicks in.


When the multilevel list is working as you expected, just right-click and 'Save in List Library". Easy peasy :)


Sunday, May 3, 2009

Bubbles in Excel chart

How you ever created a bubble chart in Excel? I reckon that most of us stick to the usual bar and pie chart and the occasional line chart. Right now, I'm going to show you how to create a 3D bubble chart to represent your data.

The information in my excel here is about the market share of numerous browsers for March 2009 which I obtained from Market Share site.

First of all, let me format the data block into a table to ease the process of adding columns, rows and formula.
I have just added another column for the existence duration of each browser respectively. Formula used is 2009 - (Start Year), simple right.


I have moved the columns around a bit so that I can get the exact visualization for my bubble chart. Ok, the most obvious difference of the bubble chart compared to the rest is that it needs 3 parameters - x, y, and z value which need to have numerical value. Right now, x-axis is the Start Year (Release Year) of the browser, y-axis is the percentage of Market Share (March 2009) for the browser and z value would be represented by the size of the bubble which in my chart reflects the duration or how long the browser has been in the market. So that's regarding understanding and positioning your data.

Let's start creating the chart, select the data for column 2 till column 4 (Start Year, Total Market Share, Duration), then click on the Insert tab, and in the Charts group, choose 'Other Charts', in the drop down, you will see 'Bubble with a 3-D effect', alternatively you could use the Office 2007 shortcut keys - simply type Alt (to see the shourtcut keys) - N (Insert tab) - O (Other Charts)


There you go, your very own Bubble chart.


My work's not done yet, for I'm not too satisfied with how it looks. I want each bubble to represent each browser and have it's own significant colour. When the chart is generated automatically (remember earlier I mentioned that x,y,and z has to have numerical value) very minimal 'personalization' so to speak was done to the values.

Let's make our chart look better, look at the ribbon, the contextual tab for Chart Tools has appeared and in the Design tab, click on Select Data.


In the dialog box, what we need to do is to edit the Series.
Choose the appropriate values for the Series Name, x, y and z value.


So for the first bubble, the values should look like this, I have highlighted the data row for the bubble.

Next, 'Add' the Series and do the same thing for all the browsers' information.


Finally, the 'Select Data' dialog box would have all the browser names enlisted in the Legend Entries area.


Do you like what you see... I know I do :)