Anytime when you are not sure what a feature in Office does, always take some time and read what hints/tips that have been stated, or for Office 2007, when you mouse-over, there will a descriptive screen tip there for our reference.
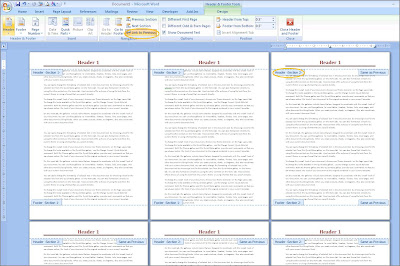
OK, you ready to start... let's begin our 'Section Break' journey, it's not too lengthy, just need some paid attention, first, we have our document which is 6 pages long with 'Header 1' specified, and it looks like this :

Right now, I want to place a section break at the bottom of Page 2 (marked by 'x'), in the Page Layout tab, click on Breaks in the Page Setup group, and choose Section Break :

After doing this, notice the circled areas in the screen shot highlighting that there are two sections currently, Section 1 and Section 2 and they are linked, rather Section 2 is 'Linked to previous' or 'Same as previous' :
When the sections are still linked, any changes made to either section will reflect across the document even though we have already inserted a Section Break so that we can have separate page properties within a single document. Here I have changed Section 2 header to 'Header 2' and look what happened :

When the sections are still linked, any changes made to either section will reflect across the document even though we have already inserted a Section Break so that we can have separate page properties within a single document. Here I have changed Section 2 header to 'Header 2' and look what happened :

To enable 'Header 1' and 'Header 2' to coexist in the same word document, simply turn off the 'Link to previous' by clicking on it:

You can actually play around with other page properties like Footer, Page Orientation etc which all follow this same section break concept, I have done an example here :
 Try it out, that wasn't so tough right :)
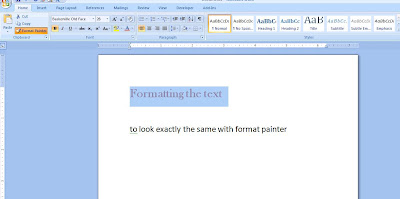
 Without going through the hassle of retracing the changes that were made so that the second line may have the exact same formatting, just highlight a word from the first line and click on 'Format Painter'.