Showing posts with label microsoft. Show all posts

Wednesday, January 6, 2010

Excel and the Web

Typically we would use Excel for our data, records, and also calculations, and right now I have an excel sheet which requires me to submit my Total Sales in Ringgit (RM) and also in USD. Before anything, let's format the cells into Currency with 2 decimal places, how I did that was just by highlighting the two cells and right-click followed by the option 'Format Cells'. In the Number tab, make the proper formatting.


I went on the internet and browsed for a site for me to refer the currency exchange rates to convert my RM to USD, and I found one on MSN. Now I am going to copy the URL of the site.


Returning to my excel worksheet from the browser, I will now refer to that currency exchange site in my RM to USD conversion formula. In excel, go to the Data tab, and in the Get External Data group, click on the feature called 'From Web' and this will actually launch a browser-like window from within excel. Paste the copied URL into the Address box in the excel browser and 'Go'.

The currency exchange website will now be loaded into the excel browser, the only difference between this and what we saw in the internet browser is that here there are tiny yellow boxes with arrows in them for us to specify the areas that we want to import into our excel sheet.

I'm going to select this Currency Rates table here by clicking on the yellow box and then hit the 'Import' button at the bottom.


After this, just specify the area to place imported data, for this I am going to select the current sheet, just below my Total Sales value. You can choose your own settings for the imported data, to do this click on the Properties button.


You will see a window like this where you can select the suitable 'Refresh Control' (for instance) for that data that you're importing from the web. Everytime the data changes in the browser, it will be reflected in your excel sheet.


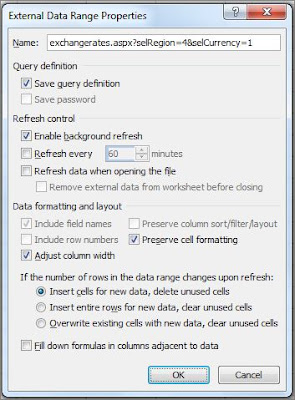
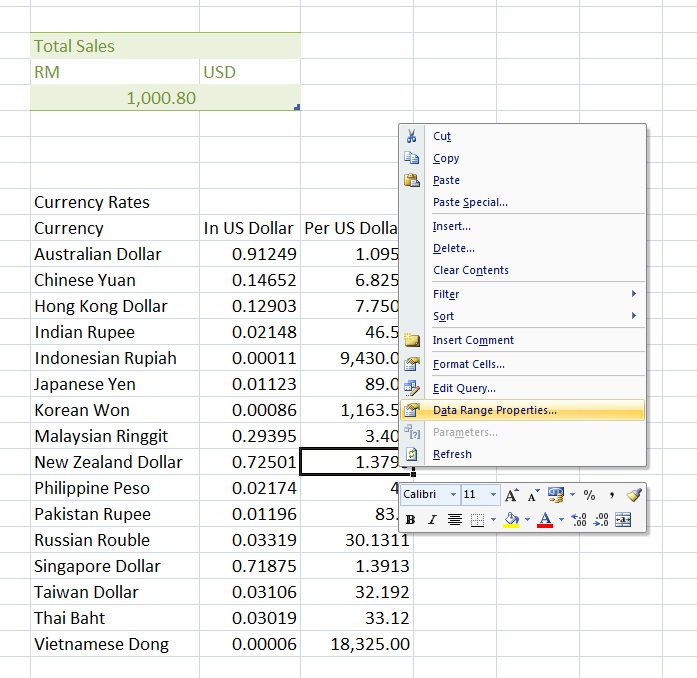
Click 'Ok' and you will have the same currency rates table placed in your excel sheet at the location that you have specified. Here I have right-clicked and when you choose the 'Data Range Properties' you will see the same settings when you hit the 'Properties' button previously. 'Refresh' there indicates that the data is live/linked to the web.


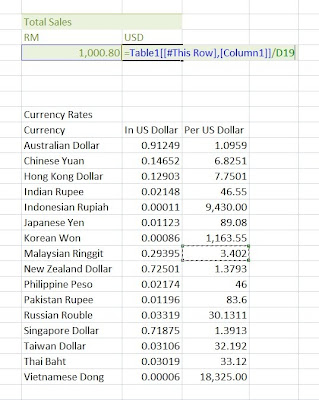
I shall refer to the value here and use it in my conversion formula and not have worries of inaccuracy or doing repeatitive formula updates.


Oh yea.... CHEERS to an exciting 2010 for all.... especially with the launch of Office 2010 coming soon :)

Sunday, August 2, 2009

Headers, Footers, Page Numbers

I have been so caught up with work and my weekends have been too short so yea...forgive me for leaving such a big gap since my last post.. Now let's get back to more 'work smart' with Office 2007, shall we ;)

This post comes from a question which I received from a user when he was creating his documentation. This was the scenario : his document has a cover page, a table of content, and the document body. He had problems fixing the header and the page numbering.

Let's start on this, what I have done in this document here is to put in all my content, the proper headings, generated the table of content and also inserted the cover page (notice the lovely sunflower there :) ) First step would be to settle the content of your document.


Right now, I have just inserted the header (Insert tab > Header > choose the header which you want), the headers have come out on all 4 pages.


I also want the page number to be shown in the header, so I've set my cursor to the end of the header (after '2009') and since the cursor is within the the header, the contextual tab for Header & Footer Tools > Design tab is shown in the ribbon. Choose the Page Number > Current Position and select the number formatting of your choice.

The header now contains the document name, year and also the page number. Next I would like to set a new section for the 'Introduction' portion onwards. Therefore my cover page and table of contents (toc) will be in Section 1, and Introduction onwards will be in Section 2. Click at the beginning of the heading 'Introduction' and go to the Page Layout tab > Breaks > Sections Breaks (Next Page) to do this, or refer to my previous post. I only want my content ('Introduction' onwards) to have the header and page numbering, that starts from page 1.


Click within the 'Header - Section 1' and in the contextual tab for Header & Footer Tools > Design tab in the Options group, make sure the 'Different First Page' option has been cleared, afterthat navigate to the next section by clicking on 'Next Section'.


We are now in Header - Section 2, perform the same checking, make sure the 'Different First Page' option is cleared as well, and turn of 'Link to Previous' so that Section is independent of Section 1.

Once we have done those two checks, click within the document body of Section 1 (cover page and toc), go to the Insert tab, and in Header, choose 'Remove Header' right at the bottom of the options list. This will remove the header in Section 1.


Move to Section 2, choose Page Number (still in the Insert tab) and click on 'Format Page Numbers'. In the Page Number format window, under 'Page Numbering' select the option to Start at: "1" and voila...


That's all there is to it, of course if you follow the steps accordingly.. ;) These steps apply for footers as well.

Sunday, May 3, 2009

Bubbles in Excel chart

How you ever created a bubble chart in Excel? I reckon that most of us stick to the usual bar and pie chart and the occasional line chart. Right now, I'm going to show you how to create a 3D bubble chart to represent your data.

The information in my excel here is about the market share of numerous browsers for March 2009 which I obtained from Market Share site.

First of all, let me format the data block into a table to ease the process of adding columns, rows and formula.
I have just added another column for the existence duration of each browser respectively. Formula used is 2009 - (Start Year), simple right.


I have moved the columns around a bit so that I can get the exact visualization for my bubble chart. Ok, the most obvious difference of the bubble chart compared to the rest is that it needs 3 parameters - x, y, and z value which need to have numerical value. Right now, x-axis is the Start Year (Release Year) of the browser, y-axis is the percentage of Market Share (March 2009) for the browser and z value would be represented by the size of the bubble which in my chart reflects the duration or how long the browser has been in the market. So that's regarding understanding and positioning your data.

Let's start creating the chart, select the data for column 2 till column 4 (Start Year, Total Market Share, Duration), then click on the Insert tab, and in the Charts group, choose 'Other Charts', in the drop down, you will see 'Bubble with a 3-D effect', alternatively you could use the Office 2007 shortcut keys - simply type Alt (to see the shourtcut keys) - N (Insert tab) - O (Other Charts)


There you go, your very own Bubble chart.


My work's not done yet, for I'm not too satisfied with how it looks. I want each bubble to represent each browser and have it's own significant colour. When the chart is generated automatically (remember earlier I mentioned that x,y,and z has to have numerical value) very minimal 'personalization' so to speak was done to the values.

Let's make our chart look better, look at the ribbon, the contextual tab for Chart Tools has appeared and in the Design tab, click on Select Data.


In the dialog box, what we need to do is to edit the Series.
Choose the appropriate values for the Series Name, x, y and z value.


So for the first bubble, the values should look like this, I have highlighted the data row for the bubble.

Next, 'Add' the Series and do the same thing for all the browsers' information.


Finally, the 'Select Data' dialog box would have all the browser names enlisted in the Legend Entries area.


Do you like what you see... I know I do :)


Monday, March 9, 2009

Outlook's Time Zone

A colleague of mine recently wanted to book another the time with someone from the London office (we're in Malaysia) for a meeting/conference call and she asked me how to do it. The Outlook calendar follows the local time, so we must always remember when it comes to diversity cases such as this, we need to check on the other person's time zone too to find the best time for both parties.
Outlook allows us to add a second time zone to our calendar. Alright, first click on Tools in the menu, and go right to the bottom of the list, and select Options.


Next, choose Calendar Options in the Calendar group.


In the 'Calendar Options' window, click on Time Zone... in the Advanced options below.


Here if you noticed, I have labeled my Current Windows time zone (local time zone) as 'Malaysia', then now to show an addtional time zone, check the box for that option and label it appropriately. After that, select the location from the Time Zone drop-down list. I have chosen London. Immediately after doing this, I see the checkbox for 'Adjust for daylight saving time' selected, so this option is only for relevant places which experience daylight saving.


Click OK to close all the subsequent windows, and now you have an extra time zone in your Day view of your calendar. Sweet!


Repeat the steps to get you back to Calendar Options window, in the 'Calendar Options' group, you will find a button there which says 'Add Holidays'. This is to have the public holidays for the selected nation to be incorporated in your outlook calendar.


I have selected 'Malaysia' of course, and also 'United States' to display more holidays. It appears like this in your calendar.

Sunday, March 1, 2009

Pain in the neck no more (TOC)

I have always dreaded the part of compiling the Table Of Contents for a documentation. Not anymore because with Ms Office Word, there is a method of automating this :) :) yea....double smiley. Stay tune for this best-kept (not really) feature which makes life so much easier, forget all the manual ways that you have been wasting your time with.

This is a fictitious document that I have prepared, entitled 'Should We Go Green', a continuation of the "green" effort from the previous posting with 'Go Green' powerpoint slides.

The most important thing here is to set the Styles for ALL the headings in the document. Do this by simply highlighting the heading, and in the Home tab, under the Styles group, choose the appropriate Heading.


Next step: You can either insert a blank page first or otherwise, then in the Reference tab, click on 'Table of Contents' and you see a few preformatted TOC, just click on the format you want and it will be inserted where your cursor has been placed.


I have inserted mine into a blank page.


To adjust the properties in the TOC, again in the Reference tab, click on the 'Table of Contents' dropdown and this time, choose 'Insert Table of Contents'. Here, you are free to adjust the levels of the heading to suit your document's requirement.
I personally feel that it is crucial to understand the usage of 'Heading' in a document for TOC and also in 'Document Map'.
Right now, I want to create my own TOC format and this is how it looks like. To save it into the TOC gallery so that I may see it with the other preformatted TOC, just click on the 'Table of Contents' dropdown and select 'Save Selection to Table of Contents Gallery'.


You then get to name this TOC format, I am calling mine 'Document Content'.


Here it is in the new list of preformatted TOC.


If you have made any changes in the document, to update the TOC, do a right-click and select 'Update Field' and Word will do all that for you :)


After your document is done, and you've sent it to a colleague for a review, thanks to Headings and TOC, he/she can easily navigate through the document via Document Map.